English French Spain Arabic

China Painting

China Painting is an ancient art that is still popular today, thousands of years after he was born. It is a form of decoration for porcelain and ceramics other involves multiple layers of special lacquer is applied to a piece of porcelain or glazed ceramic above to form a visual design. After each layer is painted, the piece is fired in an oven at the "low" to make permanent enamels. (When it comes to firing clays and glazes in the kiln, a "low" fire is about 1200 degrees F to about 1600 degrees F.) The result of these multiple layers of paint and firing is a Standing on the richly decorated room. The technique of painting on porcelain is widely used on antennas previously glazing and wall and floor tiles.

China Painting is also known as porcelain art, and porcelain is also known as porcelain. Porcelain is the preferred surface on which to paint China. It was made as early as 1480 CE, during the Ming Dynasty in China. By the 1600s, the Italians had their own forms of porcelain, enamels and began to perfect. Russian porcelain was developed in 1700. At that time, the French began to make their own form of porcelain and developed decals or transfers, like those we use today, although hand painting was quite prevalent, too. Porcelain in Dresden in Germany appeared around 1730. England has developed a "real" china shortly after. In 1769, Americans were working in porcelain. The most beautiful Limoges porcelain is called while (pronounced OZH-Lim) and shown in France around 1773. The fine white clay from which it is done can not be found in the region of France.


Porcelain is a highly refined white clay is filtered to remove impurities. Before it is difficult to cook in a hot oven, it is very fragile and crumbles easily, but once it is cooked at high temperature, it becomes extremely hard, durable and almost transparent. The result is a delicate looking piece, but hardy items that can be used for multiple purposes, tile wall to the dishes. This type of clay is not suitable for running pot, molding, carving or as raw material is not sufficiently elastic, made of porcelain liquid can be poured into molds. Chinese painting can be done on any surface fire glazed earthenware which can be baked in an oven. These surfaces are made of stoneware, porcelain, ceramics and others.
China paints are made with the same attention to design, model, color and visual texture as other forms of painting (watercolor, oil, acrylic, etc.) are made. The techniques closer to those of the artist watercolor artist from China based on the white surface to provide white in the resulting array. But the appearance is like a painting in oil-rich and deep. Once cooked, the multiple layers will not bleed into each other that do watercolors throughout the painting process. The white paint in China is on a piece of porcelain or ceramic in an infinity of possible shapes and sizes, from small boxes to large pots, tiles to dishes.

The last layer on a piece of painted porcelain can be enhanced with gold or silver hard real shot at the play, or one of the many chandeliers and add pieces of opalescent spectacular. The latter, extremely low fire glazes will not be as durable as varnish underneath. white porcelain paints are available for the surfaces to be painted other colors, but for a clean white the artist generally preferred to use the white part of his current base. Use a clean brush, cloth or an eraser, it can remove paint from areas covered it accidentally, he wishes to leave blank.

Contemporary China painting is done with a paint base made of fine crystals of minerals in the soil. They are known as overglaze. They are called overglaze because they must be applied and baked on top of other glazes that are used on the coin, if these glazes require a higher temperature range. If China enamels are fired at too high a temperature the color will fade or change and ruin. Often the tiles that were manufactured at the factory are used as glass painting surface.

The powder paint used in painting on porcelain is sold in bottles or envelopes gram in powder form. The paint can also be purchased in small apartments with oil premixed. The paint powder is mixed with oil to create the medium of painting. Many artists mix their own China oils of lavender oil or eucalyptus. Each artist has a tendency to prefer a particular type of mixture that can dry quickly and more or less the characteristics of the oil mixture to determine how fast the paint dries. Some companies sell special oils mixed especially for painting on porcelain. One of China Artists little just mix their enamel powder with water. Oil is generally preferred because it adheres to a surface gloss glazed better. Water can be used as a basis for painting if the artist will work on a matte surface.

Use a ceramic plate or white glazed tiles as a pallet, a small amount of powder is mixed with the oil using a knife or a stick until soft and creamy texture is achieved. Turpentine is used for cleaning brushes, pallets and clean up the mess. wearing protective clothing, because when mixed with oil paints may stain. It is important that the artist not breathe the powder as fine as it mixes because some colors contain lead and other toxic heavy metals.

Using a model prepared beforehand, the artist begins to apply paint only, using oil of turpentine or clarify his painting. She takes part in a furnace at 1200 degrees after each layer of paint thinner. The painting develops depth and richness with layers of paint and firing. She takes care not to let his palette of colors work together so that the result can be derived from the color on the palette. The current result is an unwanted "disturbing" color.

A painting of China can be completed and fired in a single layer, but for the depth and richness usually associated with the technique, multiple firings are generally preferred. In the first layer, the artist poses the basic model, leaving clean areas where whites are seen in the final portrait. At each subsequent layer of paint and shot the artist deepens shadows and brightens the colors until the final cooking when they come together in a satisfactory product. It is common to five to eight layers and firings on an individual piece, although more or less is sometimes.

Today, China painting is done primarily in electric ovens and gas. A small cone of clay is put in the oven with the pieces to cook. This cone of clay is a type of clay that will bend when it reaches a certain temperature, leaving the artist knows it is time to extinguish the fire.

If the artist waits too long the play could be ruined by excessive heat. Some electric ovens have a so-called "four-sitter", or a small device in which the cone bit of clay is placed. When the heat reaches a certain temperature, the cone turns and causes a small lever at the decline. This disables the oven. This makes it much easier for the artist to China not to ruin his work. For the porcelain painter hobby, there are stores that fires his pottery pieces for her, but it will have less control over how it is done.

Once the room is cooled, several layers can be painted on it, or it is ready for display or use. It takes as long as 24 hours for the oven hot enough to cool to see the finished product. The artist must use tongs with long handles and heat resistant gloves when opening an oven that has not yet cooled to protect his skin. If the part is taken then it is too hot, get it out in the air radiator can crack and ruin it, so patience must be exercised so as to let them stay in the oven until cool gradually it is cold enough. When the oven has cooled enough that the inside is returned to its normal color is red hot during the extreme temperatures of baking, the artist can usually carefully lift the lid and take a look for see if his pieces came out as expected, but if the room is much cooler than in the oven, it will be very careful because even a breeze of fresh air could be devastating.

Once the song ended, it can be considered a permanent piece of art, saving accident or disaster, will be around much longer than the artist who created it.

If you are enjoying reading this blog,Share it on Facebook, Twitter, Buzz or Reddit.

How to paint a mural step by step

Here are some easy steps to follow to have a mural in yourhome! A mural can customize your home or room and leave alasting impression on guests and family. You can assign yourfriends or relatives in the production of the mural, foster intimatepiece of art that reflects your individuality!

Suggested locations for a mural: the child's bedroom, bathroom,hallway, kitchen, playroom.


Suggested images: landscapes, flowers, psychedelic, fairy, castle, butterflies, fruit, cartoon characters, Anything you candraw! Start with something simple.


Supplies that you will need:

1. a fairly smooth wall on which to paint, with a flat finish (glossy won’t work)
2. pencils
3. stencils (if you are timid about drawing freehand)
4. brightly-colored acrylic craft or flat house paints
5. BIG drop cloth
6. a variety of paint brush sizes (very small for detail to 4 inch for painting large surfaces
7. containers to hold rinse-water for brushes

Note: It is much easier to paint on a light-colored surface. If the wall you choose is a dark color (navy, dark green, etc.) paint it white or some other light color before you begin the project.

Steps to creating your mural:

1. Clear the area surrounding the mural wall of all furniture, toys, etc.
2. Lay down the drop cloth, making sure to protect all carpeted area.
3. Use your pencil to draw the image directly onto the wall, stepping back several feet periodically to make sure the proportions of your images are correct. Don’t forget to DRAW BIG SHAPES!!!
4. Fill in the shapes with the colors of your choice, starting with the background images and layering the foreground images on top.
5. Outline the foreground images with darker colors in order to emphasize edges.
6. Step back as far as you can and look for obvious errors.
7. Correct the errors using light colored paint and then re-draw and re-paint.
8. Step back again and view the final image.
9. When completely dry to the touch, clean up the area and return furniture, etc. the proper place.

If you are enjoying reading this blog,Share it on Facebook, Twitter, Buzz or Reddit.

How To Draw Christmas Gift Boxes

As you see in the picture, its pretty simple interest. My favorite way is to start the drafting of two pairs of horizontal guide lineson both sides of the box. Notice how they approach the lines aresupposed to decline further in space. so I will outline two linesabove the top, following the same rule of recession.
When finished, a preview of intersecting lines to draw the top ofour little gift boxes. The sketch straight vertical lines from threecorners to the bottom of the guidelines to finish the box.


Then you'll need to pull the ribbon wrapped and tied around thegift of comic illustration. See how they are actually not completely straight on the sides? It is because of the thickness of the cover ofthe box. Now, draw a small button right tape at the top center of the box.

Drawing the Bow for Christmas Gift Boxes

The bow for this gift box is really simple, yet elegant enough to look likespecial Christmas gifts or luxury presents! I always draw the upper parts - the big puffy bows first, and then work on ties. This way you can easily and quickly visualize its forms and adjust accordingly.
When you finish the basic outlines, give some emphasize on inner details, such as fabric folds and creases.

Decorating with Christmas Gift Wrap

This is really exciting part of this drawing tutorial - decorating your box withcool gift wrap prints!
Mine is just a simple and easy to draw Christmas trees prints in dark green and wooden earth colors, on top of warm orange-yellow box with bright red ribbon and velvet bow. This combination worked really well for me. But you, of course, can try with your own prints or pictures, just find some small gift boxes to use as your reference. Have a look around and I am sure you will easily find dozens of them.

If you are enjoying reading this blog,Share it on Facebook, Twitter, Buzz or Reddit.

Drawing Dog Step by Step


Start with a pointy ear like a teepee on top of the circle. Then, add a nose on the top right end of the oval. To make the oval appear more snout-like you can add 'wrinkles', short arcs that start at the top of the oval and curve down to create the wrinkly snout. You can also add whiskers if you choose, and follow with a line at the end of the oval, just inside, to create the 'split' that leads down to a dog's mouth.
Your dog's basic profile is complete. Now, you can add fur. Using a zigzag line, trace back over the body to create the look of fur on the dog's back and legs. The zigzag should be more pronounced on the body than on the legs. When you've finished with the fur, you should go ahead and add paws to the feet. You can also add a paw at the bottom right of the number 'six', as the part that curves around is meant to be the bent leg when seated. Add an eye to the profile, and you are done.
When drawing dogs, you have the option to draw a tail or leave it off. You can add cute little details like a collar, and you can practice varying body sizes and shapes.
A fatter, shorter 'six' can be a base for a bull dog, while a tall, skinny 'six' can be transformed into a poodle. You can use the basic drawing and alter certain portions. For instance, you can practice drawing different snouts, which may curve up or be more square, and you can even add a tongue as though the dog were panting.
Drawing dogs is not a complex thing. As drawings done by most beginners, there is simply a method you can use to learn without becoming frustrated either looking at a blank page or never getting the right shape. Once you've gotten down the concept, it's a lot easier to experiment with your own ideas.
drawing dogs step 1
drawing dogs step 2
drawing dogs step 3
drawing dogs step 4
drawing dogs step 5

If you are enjoying reading this blog,Share it on Facebook, Twitter, Buzz or Reddit.

Drawing Dogs Step by Step


Start with a pointy ear like a teepee on top of the circle. Then, add a nose on the top right end of the oval. To make the oval appear more snout-like you can add 'wrinkles', short arcs that start at the top of the oval and curve down to create the wrinkly snout. You can also add whiskers if you choose, and follow with a line at the end of the oval, just inside, to create the 'split' that leads down to a dog's mouth.
Your dog's basic profile is complete. Now, you can add fur. Using a zigzag line, trace back over the body to create the look of fur on the dog's back and legs. The zigzag should be more pronounced on the body than on the legs. When you've finished with the fur, you should go ahead and add paws to the feet. You can also add a paw at the bottom right of the number 'six', as the part that curves around is meant to be the bent leg when seated. Add an eye to the profile, and you are done.
When drawing dogs, you have the option to draw a tail or leave it off. You can add cute little details like a collar, and you can practice varying body sizes and shapes.
A fatter, shorter 'six' can be a base for a bull dog, while a tall, skinny 'six' can be transformed into a poodle. You can use the basic drawing and alter certain portions. For instance, you can practice drawing different snouts, which may curve up or be more square, and you can even add a tongue as though the dog were panting.
Drawing dogs is not a complex thing. As drawings done by most beginners, there is simply a method you can use to learn without becoming frustrated either looking at a blank page or never getting the right shape. Once you've gotten down the concept, it's a lot easier to experiment with your own ideas.
drawing dogs step 1
drawing dogs step 2
drawing dogs step 3
drawing dogs step 4
drawing dogs step 5

If you are enjoying reading this blog,Share it on Facebook, Twitter, Buzz or Reddit.

How To Draw Butterfly

Learn To Draw Black and White Butterfly 


Step 1 - Basic Contour Lines
butterfly drawing step 1
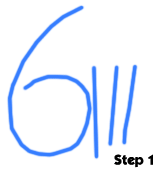
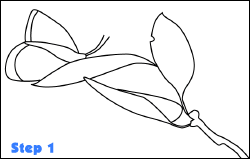
To start - get yourself a photograph to draw from. If you squint while looking at the picture some of the basic shapes should start to emerge. With the picture I used, I was able to see the following shapes of the butterfly, a branch and 3 separate leaves coming off of the branch.
Find the simple shapes in your photo and draw them lightly on the page. At this stage we are not going for perfection at all. You should only be concerned with quickly getting the drawing started. These contour lines shouldn't take you much more than a minute or two to draw. If you're taking longer than that, you're probably trying to make things overly complex.
butterfly drawing step 2
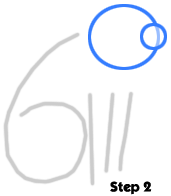
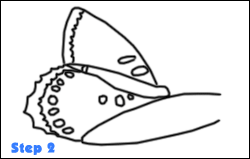
Step 2 - Adding in more details The way that I approach this butterfly drawing is no different than how I approach most of my art. I try and work from general details to specific details.
What is a general detail? That's what we created in step one. Specific details are smaller details like the ones that you can see in the step two image.
What I'm doing in this step is creating a 'blue-print' that I will later use when I am shading in the black and white drawing of a butterfly. Continue to add details to the other objects in your picture as you see fit. These aren't the only details that I will add in as you will see when you watch the drawing video. The main idea to take away from step two is working from general to specific to even more specific.
Step 3
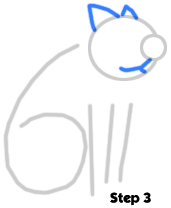
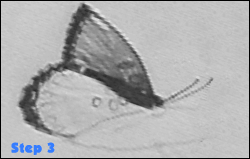
Step 3 - Shading The step three image is from the video and shows the contrast between a shaded butterfly wing, and one that only has detail lines added into it. I would suggest leaving the shading as your final step after you have added in your details.
Try working in layers when you are shading. Start with a light layer by pressing very lightly on the page. Gradually increase the pressure of your pencil as you add more and more layers of shading. The harder you press, the darker the shading.
Step 4
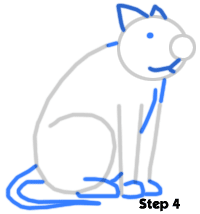
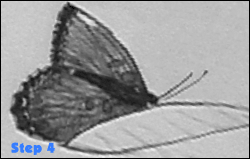
Step 4 - More Shading & Clean-upIn step four you can see the finished butterfly and an unfinished leaf. Keep going with the shading just as you were doing in step three.

If you are enjoying reading this blog,Share it on Facebook, Twitter, Buzz or Reddit.

Learn To Draw Naruto Characters

The first thing to do is to draw a rough outline of the head of our character.
An oval approximately. Also at this stage divide the oval with two perpendicular lines. One vertical one horizontal. As indicated. The vertical determines the symmetry of the face the horizontal one is the line of the eyes.
Once this is done, let's get in and establish with a few lines the neck and shoulders of Naruto (red).
Now this is a delicate part. It's time to establish the internal proportion of the face. Let's start with the eyes. As shown by the figure divide the eye line in 5 small segments. The central segment and the two segments on the side are of equal length. These last two will contain the eyes.
This is a cartoon character so the distance of the eyes from the side of the face is shorter than real anatomy and eyes are much bigger.
Ears are approximately two eyes long and are cut precisely in half by the eye line.
The nose line is exactly distant one eye length from the eye line so it's easy to position.
Finally the mouth line is approximately half eye length from the nose line.
To draw the eyes simply draw an oval that starts and ends within the marks we have done previously. The eyes have not this shape but we'll get in soon and shape them properly.
Eyebrows are just two thick lines and, you see, nose and mouth are really easy to draw.
Finally draw the headband that occupies al the forehead. It starts just where the ears are.
Let's start put some detail into the eye and eyebrow now. I have drawn only the right eye here to show you the difference to our sketchy eye.
The bottom part of the eye is flat then it goes up in a gentle curvature. The upper part o the contrary is round and stays pretty much close to the shape of the oval we sketched in the first place.
The eyebrow is just slightly thicker see? Narrower in the middle and slightly bolder on top of the eye.
To draw the pupil make a cross in the eye and center the pupil and iris in the middle of that cross. Remember that pupil and iris are concentric.
Drawing the hairs can be a chore but here is a trick to draw them perfectly.
Starting from the upper side of the headband draw these curved lines moving outward (see the arrowhead) and laterally. The central lines are linger than the lateral ones. Using these lines as a reference we'll build the hair mass in the next step.
The way I used to color this drawing uses a technique based on flat colors laid on different levels underneath the drawing. This technique is simple and achieves a decent result that is cartoony so perfect for this type of characters.
The thing to do is to create a layer for each area of the drawing that has a specific color. For example a layer called HAIRS where the coloration for the hairs will go, one called FACE for the face and so on. As many as you want but try to use the minimum number possible to keep things easy to manage.
So go on, create the layers and label them. All the layer shall go underneath the drawing, this is very important.
Once you have created the layers start painting inside them with a base color like in the drawing below. Choosing the right color is a tricky part and the only way to do it correctly is through a bit of trial and error.
Fill the relative ares with flat color, 100% hard brush because then you'll have to select those areas again.
When you use the eraser to delete part of the color that do not comply with the drawing use 100% hard edges as well. Now let's go on and fill those areas!
We'll use a very soft toning for this drawing, we do not want harsh shadows or highlights. To color an area of flat color simply select it in photoshop using shift+left click on PC on the correspondent layer. Once the area is selected you can play with colors in it without being afraid of coloring outside of it.
To obtain the final effect of this drawing you need to use a brush with similar characteristics: 50% soft edges, 15-20% opacity. Select a color that is slightly darker or slightly brighter than the base color and start painting in adjusting the size of the brush while you go.
Your aim is to create slight shadows and highlights building up color very slowly so to obtain this smooth and pleasant effect.
Before finalizing our drawing we want to use the same treatment for the neck-guard and a little bit the neck itself.
The final step is enhancing the shadows a little. Here is a trick to do it and to achieve a similar effect as the painting here. Apply a dark color where you want to shadow to appear. Say the face. Well apply a dark brown, for example at the sides of the face as I have done, then blur it to make it blend with the background.
Proceed as follows: create a separate layer in Photoshop and call it shadows. Apply all the shadows on this layer and then apply the BLUR filter to make the shadows blend with the background.
Before applying the final touches and creating a background for the drawing let's enhance the line work. To do it duplicate the layer where the line work is and set it to multiply mode.
The final effect will be a richer and darker line work that will give the final painting that UMPH!
The background I have created is also very simple and effective to do. Use pictorial brushes that you can find free online or just here for example, and fill randomly (but with a bit of taste) the background varying just the size and lightness of the brushes.
To finish it off apply a radial blur and you will have just completed your drawing!

Naruto the finished result

Naruto

If you are enjoying reading this blog,Share it on Facebook, Twitter, Buzz or Reddit.

Create Your Own Cartoon Boat

Learn to draw a cartoon boat

Step by step tutorial for creating a cartoon boat
Creating boat is very easy , here we have explained the very easy and simple steps for creating your own boat.  After creating your boat you can add colors to it.

Step 1:- Create  a shape as shown in picture below
How to Draw | cartoon boat step1
Step 2:- Now add shapes for sail as shown in picture below
How to Draw | cartoon boat step2
Step 3:- Now create 5 circles as shown below
How to Draw | cartoon boat step3
Step 4:- Now create outline by joining all shapes
How to Draw | cartoon boat step4
Step 5:- Now erase all reference line and highlight the outline and color your boat
How to Draw | cartoon boat step5
Your cartoon boat is ready to take you for a ride.

If you are enjoying reading this blog,Share it on Facebook, Twitter, Buzz or Reddit.

Painting For Beginners:What Are the Options When It Comes to Paint?

Decide What Paint to Use
Think about the characteristics of the different types of paint available before you buy.
Photo © Marion Boddy-Evans. Licensed to About.com, Inc
Having decided you'd like to learn to paint, you obviously need to select what kind of paint you're going to use. The most commonly used paints are acrylics, oils, watercolors, and pastels. (These are certainly not the only options, just the most popular and the best place to start.) Each has its advantages and disadvantages. Which you select will depend on your personality and, to some extent, where you're going to paint. This article will help you decide, as will the Painting Personality Quiz.
Besides the characteristics of the different types of paint, there are also a few other considerations:
  • Cost: Top-quality paint and canvas is expensive but dirt-cheap paint won't give you good results when mixing colors. You need to find a balance between paint that's of a quality to give good colors but cheap enough that you don't worry too much about using it up (or wasting it).
  • Poison hazards: If you've small children, you may not want to have the solvents used in oil painting lying around. Some people are also allergic to the solvents, in which case you might investigate low-odor versions or are water-based oil paints. Soft pastels can product a lot of dust; be careful to minimize the amount you inhale. For example, don't blow on your work to remove loose pastel. Poisonous pigments, such as cadmium red, are usually available as a non-toxic hue. Not that any paint is made to be eaten! (See Also: Safety Tips for Using Art Materials).
Personally I think acrylics are the best choice for beginners as they're easy to learn to use, dilute and clean up with water, and there are brands available that are a good balance between quality and price. So let's look at the Advantages of Acrylics...

If you are enjoying reading this blog,Share it on Facebook, Twitter, Buzz or Reddit.

Tips for artists on painting glazes

Tips for artists on painting glazes using oil paints, acrylics, or watercolors
A glaze is simply a thin, transparent layer of paint and glazing is simply building up color by applying thin, transparent layers one of top of another, dry layer. Each glaze tints or modifies those beneath it. So why is glazing something that can trouble, and even threaten, artists so much? Well, while the theory may be simple, putting it into practice takes patience and persistence to master.
If you’re a painter who needs instant gratification, glazing is probably not for you. But if you’re a painter wanting to take your paintings up a notch, glazing will give you colors with a luminosity, richness, and depth you cannot get by mixing colors on a palette. Why is this? In very basic terms, it’s because light travels through all the transparent layers (glazes), bounces off the canvas, and reflects back at you. Your eyes mix the layers of color to ‘see’ the final color, giving a luminosity you don’t get with a physically mixed color.
Painting Glazes Tip No. 1: Get to Know Your Transparent Colors
Take the time to learn which pigments are transparent, semi-transparent, or opaque. Some manufacturers state this on their paint tubes (see How to Read a Paint Tube Label), but you can also test for yourself.
Transparent colors work best for building up rich, subtle colors through layers of glazes, but this is not to say you shouldn’t experiment with opaque colors. But if you’re just starting to investigate glazing, stick to transparent colors for your glazes initially and keep opaque colors for the initial layers. (How to check if a color is transparent.)
Painting Glazes Tip No. 2: Be Extremely Patient
If you apply a glaze onto paint that isn’t totally dry, the layers of paint will mix together, which is just what you don’t want to happen. Be patient rather than sorry. If you’re working in acrylics, you can speed up things up by using a hair drier to dry a glaze. How soon an oil glaze will be dry depends on the climate you live in and your studio condition; do some sample glazes to find out. The paint must be dry to the touch, not sticky. Work on several paintings at once so you can move from one to another while you wait for a glaze to dry.
Painting Glazes Tip No. 3: Glazes Like Smooth Surfaces
A glaze is a thin layer of paint which should lie smoothly on top of the previous layers. You don’t want it to collect or puddle on any roughness on your support, or rather not when you first start glazing. (It’s something to experiment with once you’ve mastered the basics of glazing.) A smooth hardboard panel or fine-weave canvas is ideal to start with.
Painting Glazes Tip No. 4: Use a Light Ground
Use a light-colored or white ground, which helps reflect light, rather than a dark one, which helps absorb light. If you’re not convinced, do a test by painting exactly the same glazes on a white ground and a black or dark brown one.
Painting Glazes Tip No. 5: Glazing Mediums
Glazing mediums thin the paint you’re using to the right constituency for glazing and, if you buy a fast-drying formula, speed up the rate at which the paint dries. They also solve any possible adhesion problems arising from diluting the paint too much, particularly with acrylics (see How Much Medium Can You Add to Acrylic Paint?). Experiment with the ratio of medium to paint to get a feel for how much to add; too much and you sometimes get a glassy, excessively glossy effect.
Painting Glazes Tip No. 6: Use a Soft Brush
Glazes want to be painted smoothly, without visible brush marks. Use a soft brush with rounded edges, such as a filbert brush. You can glaze with a stiff, hog-hair brush, but it’s not ideal if you’re new to glazing. Flicking over the top of the paint with a dry fan or hake brush is useful way to eliminate visible brush marks.
Painting Glazes Tip No. 7: Unify a Painting With a Final Glaze
When the painting is finished, apply one final glaze over the whole painting. This helps unify all the parts of the painting. An alternative is to apply a final unifying glaze to just the elements in the focal point.

If you are enjoying reading this blog,Share it on Facebook, Twitter, Buzz or Reddit.

Getting started with acrylic paints

Choosing and Using Acrylic Paints

Acrylics Paints for All ApplicationsAcrylic paints are one of the newest painting mediums, being introduced as 'recently' as 1955. They have come a long way since then, with an ever-widening range of paints and associated art materials.
The acrylic paint technique thus offers both the new and experienced artist a very versatile method of painting.

What Are Acrylic Paints?

A water-based medium, the usual texture and consistency is similar to oil paints. However, unlike oils, you can get acrylics in various densities.
These range from an ink-like consistency thin enough to be used in airbrushes through various degrees of 'flow' very much like oil paints, to the consistency of soft cream cheese.
This allows really heavy 3D (impasto) effects.
Various substances are available to be added to the paint to create all sorts of textures.
Or you can use your own, such as plaster or sand, for a further variety of textured effects.
All the brands and thicknesses can be thinned back down using water. Some artists I know actually use thinned down acrylic in a pure watercolor style. This gives subtly different but important qualities


Pros & Cons of Using Acrylic Paints

As in all painting, the acrylic paint technique has benefits and drawbacks. The good things are that:


  • It is easily diluted with water, so there's no need for special thinners

  • Brushes are cleaned with soap and water

  • By and large you use the same brushes and knives as with oil paints, so you don't need to re-invest in this area

  • If you prefer however, an increasing range of 'acrylic-specific' brushes is coming on the market which gives you extra options

  • It dries fast - often within minutes - unlike oils which can take weeks or even months

  • Once dry, you can instantly put additional layers on top without ever muddying the ones below -as can happen with watercolor paints


  • You can paint on a wide range of surfaces including art canvas, watercolor and other types of specially formulated oil and acrylic paper, wood, various types of board - or even use your room walls as large murals!
  • Colors change very little from their wet to dry state - unlike watercolors - so the strength of colour you see first is what you end up with

  • It washes off clothes and carpets when wet, just by using soap and water

  • There is no solvent-type smell, as there is with oils and turpentine

  • Thinned acrylic paint makes an excellent underpainting if you're using oils


However, like all paintng mediums, there are downsides when using acrylic paint. These are mainly around one of its main virtues... its quick drying properties. Here are some things you need to consider:


  • Drying so quickly makes it difficult to subtly blend paint, as you can with oils - when painting a cloudy sky or portraits for example

  • You have to keep all your brushes moist as you are painting. Never let them dry with acrylic paint on the bristles or you'll end up with a nice-looking set of short garden canes.

  • Paint which dries on the blade of a palette knife is very hard to get off. This can leave a film which may adversely affect the ability of the knife to make a smooth mark

  • You need a special palette to stop your paints drying out as well. These aren't cheap for what they are. (However, read the article on acrylic paint techniques to find out how to easily make one for next to nothing)

  • If acrylic paint dries on carpets, clothes etc, you'll be lucky to get the stain off. So wear old clothes and/or cover the table and floor with an old cloth!

  • If there's any grease on the painting surface, acrylics will not adhere, unlike oil paints.

  • Acrylic paint tends to be quietly abrasive and soon takes its toll on softer brushes. Try using it with a small nylon 00 watercolor brush, for example, and you'll be lucky to get more than two or three good sessions out of it

  • If acrylic paint gets inside the ferrule and dries it's almost impossible to get out without damaging the brush hairs. What then happens is the dried paint makes the bristles spread and the brush loses much of its value as a quality tool

  • Don't leave the tops off tubes of acrylic paint, the contents will go rock hard in no time. If this happens, you throw them away. Full stop

  • Some brands of acrylic paint have small tops on the tubes. They are extremely difficult to get off as the paint dries in the threads.

  • If you have problems gripping small items, you may want to choose tubes which have large caps - or buy a good pair of pliers!

  • Acrylic paint is a close cousin of PVA glue and as such, quite an effective, if somewhat colourful, adhesive.


Brushes & Palette Knives

You can use the same brushes for acrylic paints as you would with oils - as long as you haven't let the acrylic paint dry on them!

Have a look at the following points you should be aware of:


  • Bristle brushes will leave lovely textured brush marks in the thicker acrylic paints. Palette knives will also leave their own distinct texture.

  • You can also use brushes designed for watercolor. However, I certainly wouldn't use my best or favorite watercolor brushes with acrylic paints.
  • You can buy a widening range of acrylic brushes especially designed for the acrylic paint technique.

  • These tend to have nylon filaments, softer than bristle but coarser than the synthetic or natural hairs used in watercolor brushes.

  • When using acrylic paints, always have a shallow tray filled with about 1/2inch of water as well as a jar of water for rinsing and thinning paint.

  • As you rinse a brush, lay it flat on the side of the tray with the bristles in the water, so they don't bend.

  • You can leave nylon and bristle brushes like this almost indefinitely, though I prefer to clean and dry my brushes thoroughly once I've finished a painting session for the day. It only takes about 5 - 10 minutes.


Painting Surfaces

Despite the disadvantages we've looked at, acrylic paint is really a very versatile medium. This is particularly evident when looking at the surfaces you can actually use on which to paint.

As a direct alternative to oils, acrylic on canvas is an excellent choice.

Make sure though, the canvas is coated with an acrylic, rather than oil-based primer, or gesso (a product specially made for the acrylic painting technique). Acrylics won't stick to an oil-based primer.

You can use various papers and watercolor paper is particularly good, even for the thicker paint.

Although it doesn't have to be primed, it is helpful to stop paint soaking in to the surface and risking leaving a patchy image.

This also applies to painting on boards such as Masonite and MDF. In fact you can exploit the primer or gesso properties by putting it on with a coarse house-painting brush.

If you only have household latex-type emulsion paint, use that instead, for a cheap primer.

Add a touch of acrylic colour to it (Raw Sienna is good) to give a warm base to your picture.

Paint first in one direction, then when dry, lightly in the other. With care you can create a nice texture that approximates to canvas, which will show through your picture.
Alternatively try stippling the primer on for a different texture.


And if you really want to economise, I've seen some excellent acrylic pictures painted on brown wrapping paper and even newsprint! In fact...
Looking at some of the newspapers in the UK, there are those who might say that painting over some of the drivel that's printed is a much better use for the paper!
And don't overlook the possibilities for this painting medium in your house.
If you are fed up with bland painted or papered walls in your bedroom, try painting a scene of your choice instead.
Paint on your preferred basecoat color of household latex or vinyl.
Keep this a fairly light shade. A white with a tint of another colour is ideal. Then sketch in your design.
Finally, paint the picture on the wall, using acrylic paints.
They are from the same family as household vinyl and will inter-mix without difficulty.

It doesn't have to be the whole wall, just a corner if you like. Maybe if it's one of the young one's bedrooms, they could do it themselves, under your supervision.

I can't think of a better way to persuade the kids to decorate their own room!


Palettes

You can't use a conventional wood or plastic palette with acrylics. Well, you can... once!

Acrylic paint's quick-drying, adhesive qualities make it a real pain to get off once dry. You could try scraping it with the side of a razor blade but this is slow, messy and hazardous.

Manufacturers have developed a palette that keeps paint moist for several days or longer.

Usually plastic, it consists of a shallow moulded well, about A4 size 11inches x 8 inches.

Sometimes there's a small tray moulded in to keep your brushes moist. This is very necessary as I've already described.

In the large well is placed a fairly thick piece of white absorbent paper.

This is wetted and on top is placed a translucent waterproof paper 'membrane'. On top of this you squeeze out your colours.

This waterproof membrane allows just enough dampness through to stop your paints drying out.

The palette usually has a lid which allows you to keep your paints moist for several days, providing you keep the bottom layer of paper wet.

These acrylic palettes do work extremely well. However they are, in my opinion, expensive for what they are, as is the 'special' paper.

If you are enjoying reading this blog,Share it on Facebook, Twitter, Buzz or Reddit.
Twitter Delicious Facebook Digg Stumbleupon Favorites More