This rose drawing lessons is not the easiest thing in the world to do, but if you break it down into its parts then it will be more manageable. Remember to draw lightly, especially on this complex shape because I guarantee you will need to erase some lines later on.

Step One – Inner Petals
This is a really easy step with just drawing an oval, but there's another component to this first step that must be considered. This circle represents the innermost petals of the rose drawing, and since we will be working from the inside out this is a logical place to start.
Ok, so imagine this circle as the very middle of the flower. Think of how a rose looks when all of the petals are closed and wrapped tightly together. That's kind of what this circle represents. It's just a shape, but with many petals wrapped around it. In the next steps of the drawing we'll start to add more layers of petals as they have wrapped around the middle.
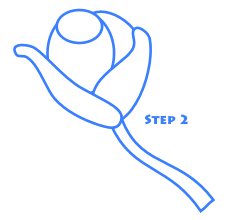
Step Two – Basic Forms
First, add a small circle on top of the shape we drew in the last step to make the opening of the rose drawing in the middle of the flower. Next, start to draw shapes around our circle from step one. The shapes look fairly random at the moment, but we'll add more details into them later on. Just look at the example picture and try to follow along as closely as possible. Finish this step by adding the stem in with two slightly curved lines.
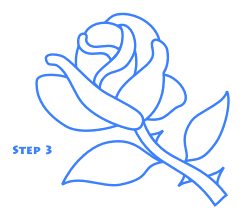 Step Three – Getting Complex
 Let's start off with the easy details here by adding two leaves to the stem. Draw the leaves first before the thorns on the stem because they are larger elements so will need to be placed more carefully than the smaller thorns or your design of your rose drawing may look off balance.
Next, start drawing the petals that wrap around the middle circle that we drew in the first step. If you can think of these shapes as wrapping around an egg it may help you to draw them so they looks more believable depending on how you see the drawing image in your mind. Once you have drawn those two inner shapes, there is two larger petals to add to the outside of the shapes.
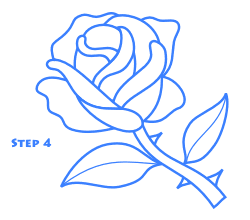
Step 4 – Petal Details
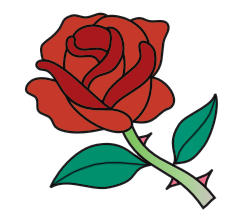
Add a simple curved line in the middle of the leaves along the stem of the rose. Next go to the petals that you created in step two and add another curved line to them. When you do this it should give the effect that the petal is curling over itself. If you look at the colored image at the top of the page this petal curl effect should be clearer.
Finish off this step by adjusting the shape of the three petals we drew in the previous step so that the lines are wavier. Add one last petal along the back of the flower behind the middle of the central circular shape from step one near the top and you're finished. If you are enjoying reading this blog,Share it on Facebook, Twitter, Buzz or Reddit.
0 التعليقات:
Post a Comment